 NLJUG – Nederlandse Java User Group NLJUG – de Nederlandse Java User Group – is opgericht in 2003. De NLJUG verenigt software ontwikkelaars, architecten, ICT managers, studenten, new media developers en haar businesspartners met algemene interesse in alle aspecten van Java Technology.
Author: Jago de Vreede
Original post on Foojay: Read More
Table of Contents
This article is a tutorial that guides you through the process of releasing a Java module with JReleaser to Maven Central with Github Actions. It is a 2025 update of the foojay.io/today/how-to-release-a-java-module-with-jreleaser-to-maven-central-with-github-actions article.
JReleaser is a tool that streamlines the release process for Java projects, allowing developers to quickly and efficiently publish their modules to Maven Central.
This article will use the SemVer Check project as an example project that uses Maven as a build tool.
Preconditions
In order to publish to Maven central, you will need to have a GPG key and have a group-id (coordinate) registered.
GPG key
You will need a GPG key to sign the artifacts, this will allow users to verify that they have the correct package.
- Download GPG key or install it with your favorite package manager.
- Generate a public key with (remember the password as we’re going to need it later)
gpg --gen-key
- Now find the id of your key with
gpg --list-keys --keyid-format=long
The output should look something like this:
/Users/jagodevreede/.gnupg/pubring.kbx
--------------------------------------
pub   rsa4096/XXXXXXXX9925B017 2022-11-17 [SC] [expires: 2026-11-17]
      C20FC085CF5B0D4D861E8CEDXXXXXXXX9925B017
uid                 [ultimate] Jago de Vreede <redacted@mail.com>
sub   rsa4096/XXXXXXXXXXXXFC74 2022-11-17 [E] [expires: 2026-11-17]
In this case, the id of the public key is XXXXXXXXXXXXFC74
- Publish your public key to a public server, for example Ubuntu:
gpg --keyserver keyserver.ubuntu.com --send-keys XXXXXXXXXXXXFC74
Coordinate (group-id)
This process is actually very well documented at https://central.sonatype.org/publish/requirements/coordinates/.
Your group id can be your domain name (reverse) if you have that. Also, many Code Hosting services are supported like GitHub, GitLab, Gitee, Bitbucket, and SourceForge. In this example, we will use GitHub, so our group-id will be io.github.jagodevreede.
In order to “claim” this group-id you will need to create an account on the Central Portal at https://central.sonatype.com. During registration, you’ll verify your namespace ownership. For GitHub-based namespaces like io.github.jagodevreede, verification is done by adding the provided verification key to a public repository. The portal will automatically verify ownership once the key is detected.
Preparing your project
Javadoc and sources
A project that is released to Maven Central requires that you attach javadoc and the sources.
This can be done by adding the 2 plugins to your build. These plugins don’t need to run every time, so it’s recommended to put them in a profile so they will only run when you need them to, or when you build a release.
A Maven example is as follows:
<profiles>
    <profile>
        <id>publication</id>
        <build>
            <plugins>
                <plugin>
                    <groupId>org.apache.maven.plugins</groupId>
                    <artifactId>maven-javadoc-plugin</artifactId>
                    <!-- 3.12.0 is the current version at the time of writing, please check if there is a newer version -->
                    <version>3.12.0</version>
                    <executions>
                        <execution>
                            <id>attach-javadocs</id>
                            <goals>
                                <goal>jar</goal>
                            </goals>
                            <configuration>
                                <attach>true</attach>
                            </configuration>
                        </execution>
                    </executions>
                </plugin>
                <plugin>
                    <groupId>org.apache.maven.plugins</groupId>
                    <artifactId>maven-source-plugin</artifactId>
                    <!-- 3.4.0 is the current version at the time of writing, please check if there is a newer version -->
                    <version>3.4.0</version>
                    <executions>
                        <execution>
                            <id>attach-sources</id>
                            <goals>
                                <goal>jar</goal>
                            </goals>
                            <configuration>
                                <attach>true</attach>
                            </configuration>
                        </execution>
                    </executions>
                </plugin>
            </plugins>
        </build>
    </profile>
</profiles>
Meta information in pom
Maven Central also requires metadata in your pom like a description, inception year, license, list of developers, and scm location.
Example configurations is:
<description>This is the root pom for the semver-check maven plugin</description>
<inceptionYear>2022</inceptionYear>

<licenses>
    <license>
        <name>Apache License, Version 2.0</name>
        <url>https://www.apache.org/licenses/LICENSE-2.0.txt</url>
        <distribution>repo</distribution>
    </license>
</licenses>

<developers>
    <developer>
        <id>jagodevreede</id>
        <name>Jago de Vreede</name>
    </developer>
</developers>

<scm>
    <connection>scm:git:https://github.com/jagodevreede/semver-check.git</connection>
    <developerConnection>scm:git:https://github.com/jagodevreede/semver-check.git</developerConnection>
    <url>https://github.com/jagodevreede/semver-check.git</url>
    <tag>HEAD</tag>
</scm>
Deploy plugin version
We need to have at least version 3.0.0 of the Maven deploy version, so add the following to the root pom
<pluginManagement>
    <plugins>
        <plugin>
            <groupId>org.apache.maven.plugins</groupId>
            <artifactId>maven-deploy-plugin</artifactId>
            <version>3.1.4</version>
        </plugin>
    </plugins>
</pluginManagement>
JReleaser
Installing locally
Now with the preconditions out of the way, it is time to install JReleaser locally to verify that everything is working before we switch to GitHub Actions. I would recommend that you do the first release locally; that way you can easily fix any errors.
Go to jreleaser.org/guide/latest/install.html and follow the instructions to install the latest stable version of JReleaser.
We need to create a configuration file for JReleaser, all this config will be put into secrets on GitHub later. Create a file in your home folder ~/.jreleaser/config.properties
An example file will look something like this:
JRELEASER_GITHUB_TOKEN=ghp_eWVzIGFsc28gc2VjcmV0==
JRELEASER_GPG_SECRET_KEY=something_base64_with_around_6500+_chars
JRELEASER_GPG_PASSPHRASE=secret
JRELEASER_GPG_PUBLIC_KEY=something_base64_with_around_3000+_chars
JRELEASER_DEPLOY_MAVEN_MAVENCENTRAL_RELEASE_DEPLOY_USERNAME=p72a6s
JRELEASER_DEPLOY_MAVEN_MAVENCENTRAL_RELEASE_DEPLOY_PASSWORD=also-secret
GitHub token
First, we need a GitHub token that has access to the repository.
Go to Settings -> Developer settings -> tokens (classic) in your GitHub profile and create a token that has “repo” access. And place this in the JReleaser config file under the key JRELEASER_GITHUB_TOKEN.
GPG keys
When we generated the keys we also listed the keys, we need to have the id of the public key, in the example above it was XXXXXXXXXXXXFC74.
First, we need to export our private key as a base64 string and put it in the config file under JRELEASER_GPG_SECRET_KEY, we can do that with (note you will need the password that you used when you created the key):
gpg --export-secret-keys XXXXXXXXXXXXFC74 | base64
The JRELEASER_GPG_PASSPHRASE is the password we used when we exported the secret key.
Next is the public key, also a base64 encoded string
gpg --export XXXXXXXXXXXXFC74 | base64
This we put in the config file under JRELEASER_GPG_PUBLIC_KEY.
Portal tokens
Lastly, we need to put the credentials that we used to upload to the portal. There is an excellent official guide on how to obtain a token here https://central.sonatype.org/publish/generate-portal-token/ put the username and password obtained in the last step of that guide in JRELEASER_DEPLOY_MAVEN_MAVENCENTRAL_RELEASE_DEPLOY_USERNAME and JRELEASER_DEPLOY_MAVEN_MAVENCENTRAL_RELEASE_DEPLOY_PASSWORD.
JReleaser configuration
We need to create a jreleaser.yml file for the project. This can be done with the cli we installed before, with the following command:
jreleaser init --format yml
You will need to edit the file and fill in the yml. This is where your copy-paste skills will shine, as almost all information can be found in the pom.xml.
Next, remove the distributions part and version from the yml. As the distribution will be added later, the version will be set via an environment variable.
Finally, add the configuration to push to Maven Central:
signing:
  active: ALWAYS
  armored: true

deploy:
  maven:
    mavenCentral:
      release-deploy:
        active: RELEASE
        url: https://central.sonatype.com/api/v1/publisher
        applyMavenCentralRules: true
        stagingRepositories:
          - target/staging-deploy
The actual local release
Now that all the preconditions and plumbing is out of the way it is time for the actual release
Prepare your Maven project to be released, so remove the -SNAPSHOT from your versions.
You can do that with the Maven versions plugin for example
mvn versions:set -DnewVersion=0.0.1
Staging
The release needs to be uploaded from a staging directory, to create that invoke the following command:
mvn -Ppublication deploy -DaltDeploymentRepository=local::file:./target/staging-deploy
Release
First, set the version that you will be releasing (this must be the same as what you got in your pom.xml)
export JRELEASER_PROJECT_VERSION=0.0.1
Then do the actual release with (note there is no staging area or anything so there is no way back after running this command):
jreleaser full-release
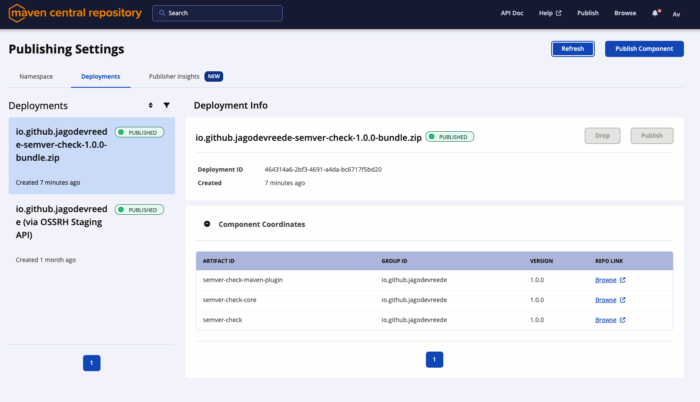
Check progress in Maven Central repository
You can login in to the Maven Central repository to see the progress.
GitHub action
Now that we can release by hand it is time to automate this entire process!
Secrets
Before we can run JReleaser on GitHub, we first need to set our secrets in the secrets of the repository.
To keep things simple just copy all the key values from the JReleaser config file that was used locally.
And you will end up with something like this:
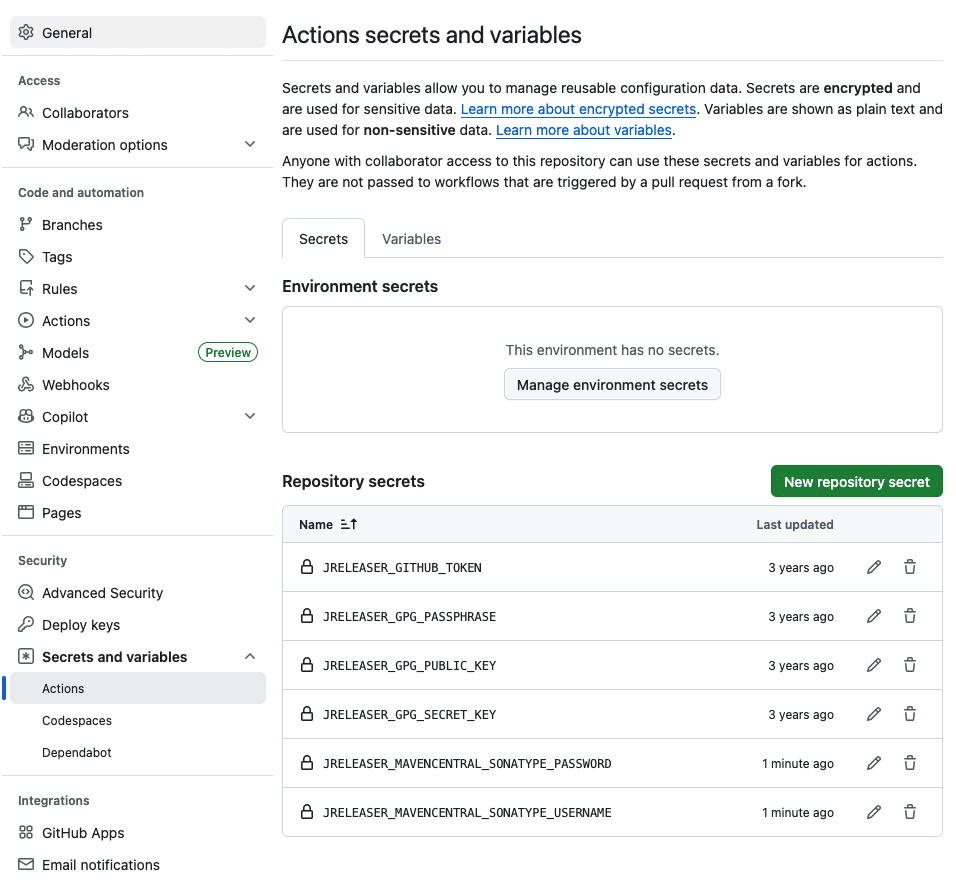
JRELEASER_DEPLOY_MAVEN_MAVENCENTRAL_RELEASE_DEPLOY_USERNAME
JRELEASER_MAVENCENTRAL_SONATYPE_USERNAMEWorkflow
First, create a release workflow by creating a release.yml file in your repository under .github/workflows/.
The first bit of the file is the name of the workflow and the input parameters used when you start the workflow.
name: Release
on:
  workflow_dispatch:
    inputs:
      version:
        description: 'Release version'
        required: true
      nextVersion:
        description: 'Next version after release (-SNAPSHOT will be added automatically)'
        required: true
This will look something like this when you start the release workflow

Next up is just your default build setup, in this example, java 11 is used, but this is the same as for your normal build. Except fetch-depth as JReleaser will use the git log to create the changelog it will need the full history, and thus we set the fetch-depth to 0. As it defaults to 1.
jobs:
  build:
    runs-on: ubuntu-latest
    steps:
      - name: Checkout
        uses: actions/checkout@v3
        with:
          fetch-depth: 0
      - name: Set up JDK 11
        uses: actions/setup-java@v3
        with:
          java-version: '11'
          distribution: 'temurin'
          cache: maven
Next, we need to set the version that we will be releasing, we can do that with the Maven versions plugin.
- name: Set release version
  run: mvn --no-transfer-progress --batch-mode versions:set -DnewVersion=${{ github.event.inputs.version }}
This change will be the code that will be released, so we want to commit that change. A tag will be created in the release process by JReleaser
- name: Commit & Push changes
  uses: actions-js/push@master
  with:
    github_token: ${{ secrets.JRELEASER_GITHUB_TOKEN }}
    message: Releasing version ${{ github.event.inputs.version }}
Now its time to stage the release, as we did manually
- name: Stage release
  run: mvn --no-transfer-progress --batch-mode -Ppublication clean deploy -DaltDeploymentRepository=local::default::file://`pwd`/target/staging-deploy
Then we can call JReleaser this is where we use the secrets we set up before.
- name: Run JReleaser
  uses: jreleaser/release-action@v2
  with:
    setup-java: false
    version: 1.20.0
  env:
    JRELEASER_PROJECT_VERSION: ${{ github.event.inputs.version }}
    JRELEASER_GITHUB_TOKEN: ${{ secrets.JRELEASER_GITHUB_TOKEN }}
    JRELEASER_GPG_PASSPHRASE: ${{ secrets.JRELEASER_GPG_PASSPHRASE }}
    JRELEASER_GPG_PUBLIC_KEY: ${{ secrets.JRELEASER_GPG_PUBLIC_KEY }}
    JRELEASER_GPG_SECRET_KEY: ${{ secrets.JRELEASER_GPG_SECRET_KEY }}
    JRELEASER_DEPLOY_MAVEN_MAVENCENTRAL_RELEASE_DEPLOY_USERNAME: ${{ secrets.JRELEASER_MAVENCENTRAL_SONATYPE_USERNAME }}
    JRELEASER_DEPLOY_MAVEN_MAVENCENTRAL_RELEASE_DEPLOY_PASSWORD: ${{ secrets.JRELEASER_MAVENCENTRAL_SONATYPE_PASSWORD }}
When we are done we need to set the next development version and push that.
- name: Set release version
  run: mvn --no-transfer-progress --batch-mode versions:set -DnewVersion=${{ github.event.inputs.nextVersion }}
- name: Commit & Push changes
  uses: actions-js/push@master
  with:
    github_token: ${{ secrets.JRELEASER_GITHUB_TOKEN }}
    message: Setting SNAPSHOT version ${{ github.event.inputs.nextVersion }}-SNAPSHOT
    tags: true
The full file can be found here: https://github.com/jagodevreede/semver-check/blob/c9353fa86eb9ae8f6b309057748672a6c1e0f435/.github/workflows/release.yml
And with that, we are done! Now we can easily release our module to Maven Central with the press of a button in GitHub.
Maven plugin
There is also a JReleaser Maven plugin available that offers a Maven DSL to configure JReleaser. With that the jreleaser.yml file can be omitted as information can be read from the pom file instead.
The use of the Maven DSL offers these benefits:
- Reduce duplication in the release configuration
- No need to install JReleaser’s CLI
- No need to use jreleaser/release-action on GitHub as invoking the Maven plugin is enough
So why is the CLI used in this article, you might ask? Well, the CLI can be used for projects other than Maven as well, and it demonstrates the capabilities of JReleaser.
Resources used
- https://central.sonatype.org/publish/publish-guide/
- https://jreleaser.org/guide/latest/examples/maven/index.html
- https://github.com/marketplace/actions/jreleaser
- https://central.sonatype.org/pages/ossrh-eol/#central-support
The post How to publish a Java Maven project to Maven Central using JReleaser and GitHub Actions (2025 Guide) appeared first on foojay.