 NLJUG – Nederlandse Java User Group NLJUG – de Nederlandse Java User Group – is opgericht in 2003. De NLJUG verenigt software ontwikkelaars, architecten, ICT managers, studenten, new media developers en haar businesspartners met algemene interesse in alle aspecten van Java Technology.
This guide will describe how to publish the JDesk framework to Maven Central.
The project is written in Java using Maven as the build tool. So, the process will be detailed for Java projects with a pom.xml file.
You can follow this article if you need to publish a Java Maven-based library or artifact to Maven.
Get Ready for Publishing Packages
Publishing a Java artifact is not as trivial as Python or JavaScript packages can be deployed.
You have to comply with several rules.
I will show the general steps to publish the artifact.
Basic Requirements
You need to own a domain name where the package is going to live or be hosted. It is not necessary to have a domain name for each package, you can use the GitHub.io page that is generated from your project, but for real packages is required to have a professional domain. In this case, the domain is jdesk.mathsoftware.engineer.
This is semantic, therefore you follow the subsets of: engineers (all engineers) -> mathsoftware (me, a particular engineer) -> jdesk (a project of mine).
Later, the reverse DNS has to be used for the standard Java packaging convention. That is, engineer.mathsoftware.jdesk.
Safety
You will also need a private key to sign the artifact. Generate a GPG key to use. Then run gpg --gen-key and set it up like when you generate a GitHub GPG key.
Build Tool
You can use Gradle or Maven as the build tool. Because of the nature of this project, I chose to use Maven in the beginning. So this article will use Maven to configure the pom.xml file.
You need to have Maven installed into your system. Go to download Apache Maven, uncompress the file, then add the entry to the Path environment variable with the value of the bin directory, like “C:Usersuserapache-maven-3.8.5bin” (Windows). Check this installation by running “mvn –version” into a new terminal.
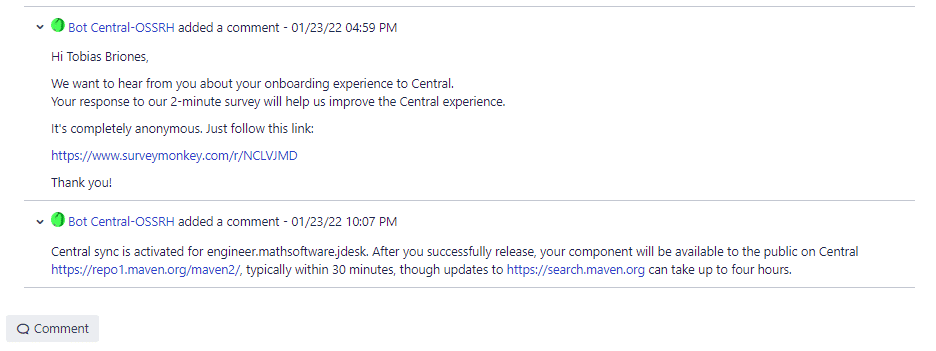
Create a JIRA Account and Request a Ticket
First, you will need to have a Sonatype JIRA account to open a new ticket to request your access to publish your artifact.
This sounds really weird, at least for the first time I had to do it. Just keep carrying on.
Then, create a JIRA ticket to fill your information. I will add screenshots to get you an idea of how to proceed. Then you will be assisted by a bot to complete your request.

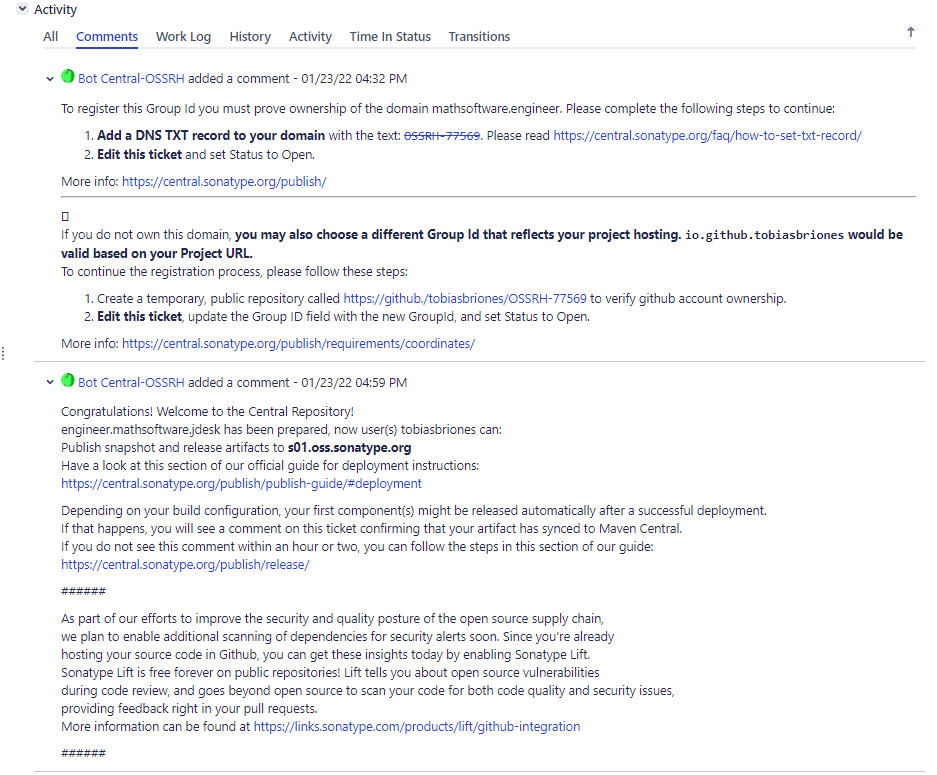
As shown above, you have to fill your domain name, and the project’s Git repository. Then prove ownership by adding a text record to your domain.
Next Steps
That was the overall process. You can read Publish Artifacts to Maven Central | JetBrains Space and OSSRH Guide – The Central Repository Documentation for more details.
You will need to upload your PG key, read Working with PGP Signatures – The Central Repository Documentation to complete this step. Recall to set a secure passphrase, expiration date, and store the key, and its backup safely too.
Release Version
Two kind of releases are used for Java packages.
The normal versions, like 0.1.0 and SNAPSHOT versions like 0.1.0-SNAPSHOT.
This is also confusing, but it only means that the SNAPSHOT version that goes to
a basic repository can still have minimum changes by the developer, so the
consumer knows that version might change a little yet. The normal version on the
other hand, is deployed to the main repository, and it takes about 4 hours to
reflect the changes.
Save your Environment Variables
You can safely store your credentials into the .m2/settings.xml file in your
user’s home directory.
In order to connect to your OSSRH, you will give your credentials to the maven
command.
Your file will look like this:
            ossrh
            { username }
            { password }


            ossrh

                true


                gpg
                { gpg-key }
                { gpg-passphrase }
You will add your credentials. I would like to store encrypted passwords instead, but that would be another step to add tho this guide.
TIP: Run gpg --list-secret-keys --keyid-format=long to check the GPG keys installed on your machine. Then you can get your key’s id. You will copy the long HEX number, read the PG guide given above to check more details.
This process can be tricky, so you will likely have to solve some issues in the way.
Set Up Maven in the Project
This is the configuration that was applied to the project. It has many things, so it is exhausting. Once this is done properly, the release without errors will be trivial.
The following is to be added to the pom.xml file of the project, apart from the standard properties like group id, version, etc.
The general information like name, description, etc., will be shown when the artifact gets deployed on Maven.
As you can see, the first tags are just general project information:
    JDesk

        Library/Framework to build better Java Swing desktop apps.

    https://jdesk.mathsoftware.engineer


            BSD 3-Clause License
            https://opensource.org/licenses/BSD-3-Clause


            Tobias Briones
            dev@mathsoftware.engineer
            Tobias Briones
            https://mathsoftware.engineer
Then, other information about the project’s repository:
            scm:git:git://github.com/tobiasbriones/jdesk.git


            scm:git:ssh://github.com:tobiasbriones/jdesk.git

        https://github.com/tobiasbriones/jdesk
Build Config
This will add the configuration for the build tag.
Add the maven plugin for source code:
    org.apache.maven.plugins
    maven-source-plugin
    3.2.1


            attach-sources

                jar-no-fork
and the other for the javadocs, the javadoc binary has to be set to match your system’s javadoc:
    org.apache.maven.plugins
    maven-javadoc-plugin
    3.2.0


            attach-javadocs

                jar


            ${java.home}/bin/javadoc
Then, we need two more plugins:
    org.apache.maven.plugins
    maven-surefire-plugin
    2.22.2
    org.sonatype.plugins
    nexus-staging-maven-plugin
    1.6.8
    true

        ossrh
        https://s01.oss.sonatype.org/
        true
The final build configuration will look like this:
            org.apache.maven.plugins
            maven-source-plugin
            3.2.1


                    attach-sources

                        jar-no-fork


            org.apache.maven.plugins
            maven-javadoc-plugin
            3.2.0


                    attach-javadocs

                        jar


                    ${java.home}/bin/javadoc


            org.apache.maven.plugins
            maven-surefire-plugin
            2.22.2


            org.sonatype.plugins
            nexus-staging-maven-plugin
            1.6.8
            true

                ossrh
                https://s01.oss.sonatype.org/
                true
Distribution Management Config
Add this child to the project’s root:
        ossrh

            https://s01.oss.sonatype.org/content/repositories/snapshots


        ossrh

            https://s01.oss.sonatype.org/service/local/staging/deploy/maven2/
That way, you set the repositories for snapshots, and final release. If you go to the snapshot repository link, you will literally find the directory for all the repositories added with their reverse DNS.
Profiles Config
We’ll want to run a profile called ci-cd with the following configuration:
        ci-cd


                    org.apache.maven.plugins
                    maven-gpg-plugin
                    1.6


                            sign-artifacts
                            verify

                                sign


                                ${gpg.keyname}

                                    ${gpg.keyname}


                                    --pinentry-mode
                                    loopback
Visit Introduction to Build Profiles | Apache Maven to learn more about Maven profiles.
This configuration is tricky. It’s useful for verification of the GPG signature, and it looks like it’ll prevent some issues.
Read more about this plugin at GPG Plugin | Maven. This plugin allows us to deploy signed artifacts.
The pinentry-mode argument set to loopback passed to the GPG program allows to enter the passphrase via terminal instead of via the Pinentry GUI.
I have also read that you have to use the Pinentry GUI to enter your passphrase, and do not enter it on the terminal, so take this into account. As documented above, the GPG passphrase is stored in the `settings.xml` file, so this should not concern here.
This means that the program will inline the passphrase when signing the artifact.
This is the profile to run when deploying the artifact.
Maven pom.xml File
The final pom.xml file ends up like this.
Deploy the Project
In this last step, if everything is all right, we can now deploy the artifact. Add “-SNAPSHOT” if you will deploy to the snapshot repository. For example:
0.1.0-SNAPSHOT
or else:
0.1.0
Open Git Bash into the project’s directory and run the deploy-command with the ” ci-cd” profile:
mvn clean deploy -Pci-cd
This will give you an output like this if you deploy a snapshot:

Recall that the production release takes some 4 waiting hours to complete the
deployment and be available at Maven Search.
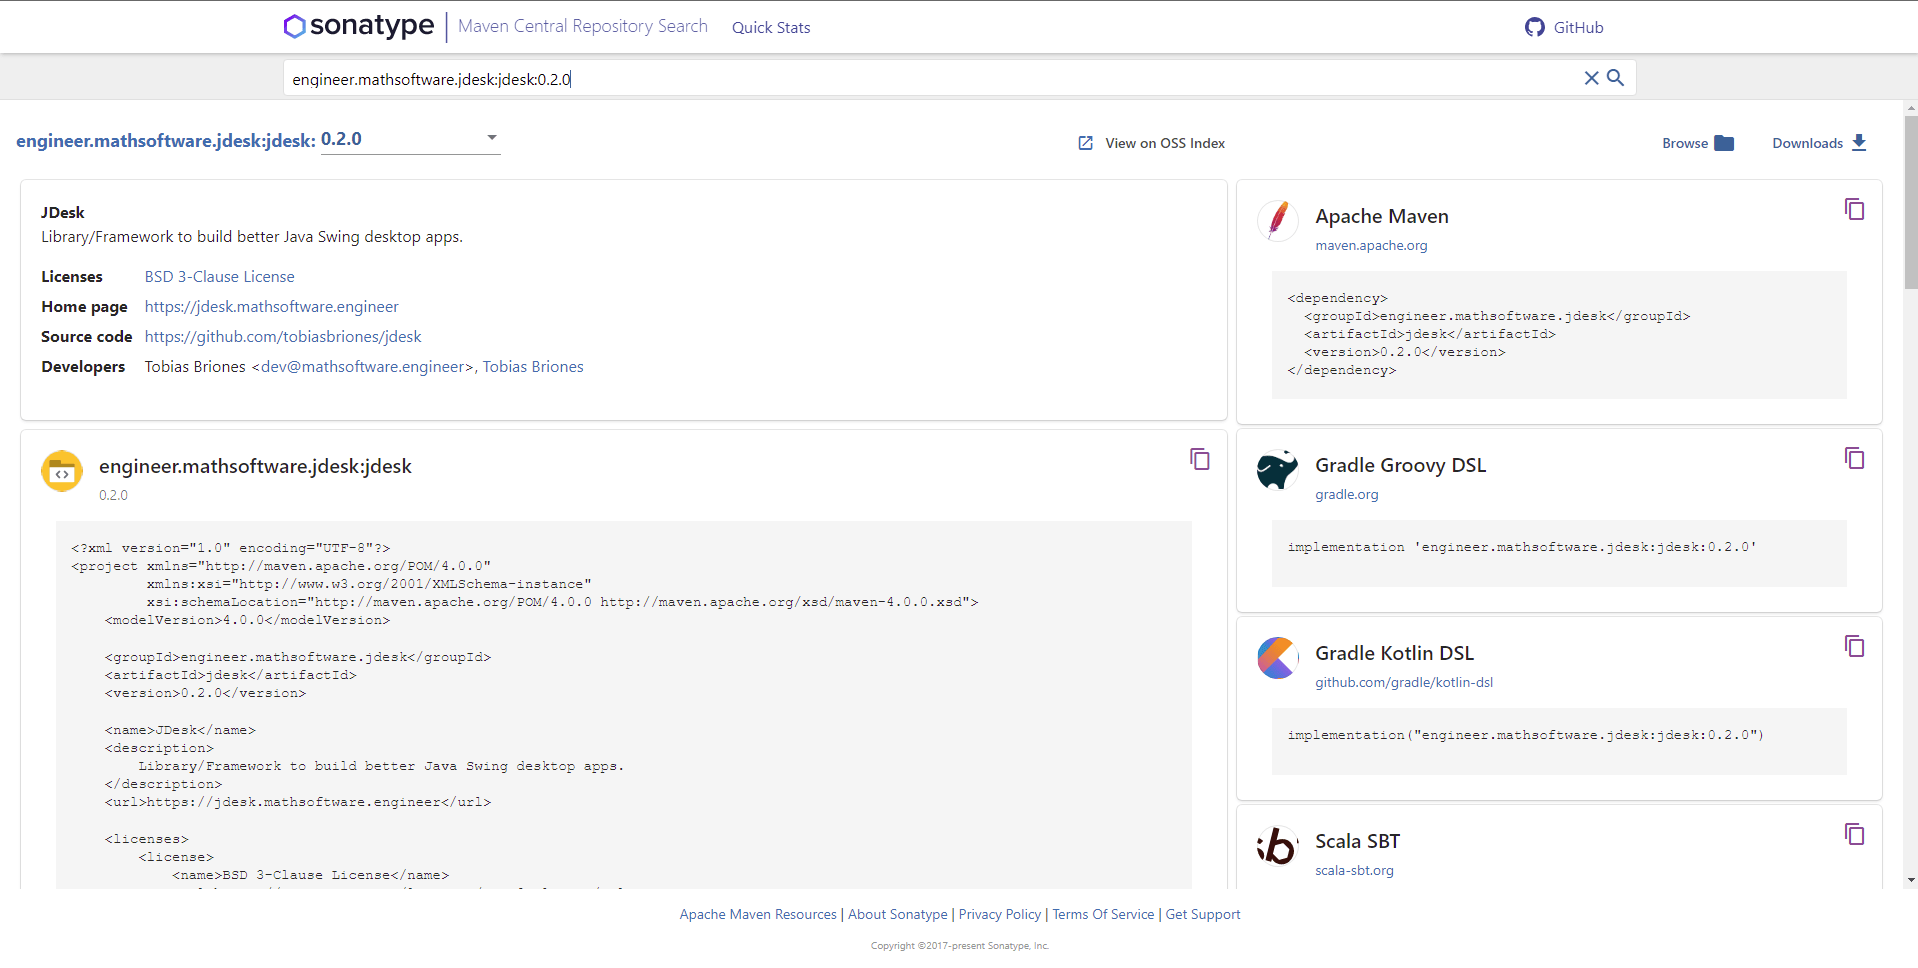
Result
After deploying to the main repository, which took more than 4 hours to get it
done, the result is there:
Conclusion
The deployment of a Java Maven-based library to the Maven Central Repository was documented so users can import the library into their Java projects.
Recommendations
- Make sure you include good JavaDocs in your project. That is important for a library that is going to be used by others.
- The process might throw errors or warnings, always try to fix warnings as much as possible.
- One error you might face is due to wrong JavaDocs. So make sure your IDE checks right your JavaDocs in your code, with no syntax errors
- Use semantic versioning, in Java we are careful about breaking changes.
- Read the docs to get further understanding, this is a general guide, so you can understand the process. The Sonatype servers, and Maven docs have also changed in the past.
The post How to Publish a Java Maven Project to the Maven Central Repository appeared first on foojay.