 NLJUG – Nederlandse Java User Group NLJUG – de Nederlandse Java User Group – is opgericht in 2003. De NLJUG verenigt software ontwikkelaars, architecten, ICT managers, studenten, new media developers en haar businesspartners met algemene interesse in alle aspecten van Java Technology.
In this article, you will learn how to set up IntelliJ IDEA Ultimate to work with Apache Tomcat, herein referred to simply as Tomcat.
We will create a new project that uses Tomcat and then talk about using Tomcat in IntelliJ IDEA so you can benefit from the rich integration capabilities.
Downloading Apache Tomcat
To use Tomcat with IntelliJ IDEA, it needs to be installed on your machine. If you don’t already have Tomcat installed, you can download the latest version, which at the time of writing, is Tomcat 10.
Once you have downloaded the appropriate file for your operating system, unzip it and place the folder in your chosen location.
You will need to point to the folder from IntelliJ IDEA when the time comes.
Creating a New Application Based on Tomcat
We’re going to create a small web application that runs on Tomcat to demonstrate the integration in IntelliJ IDEA Ultimate:
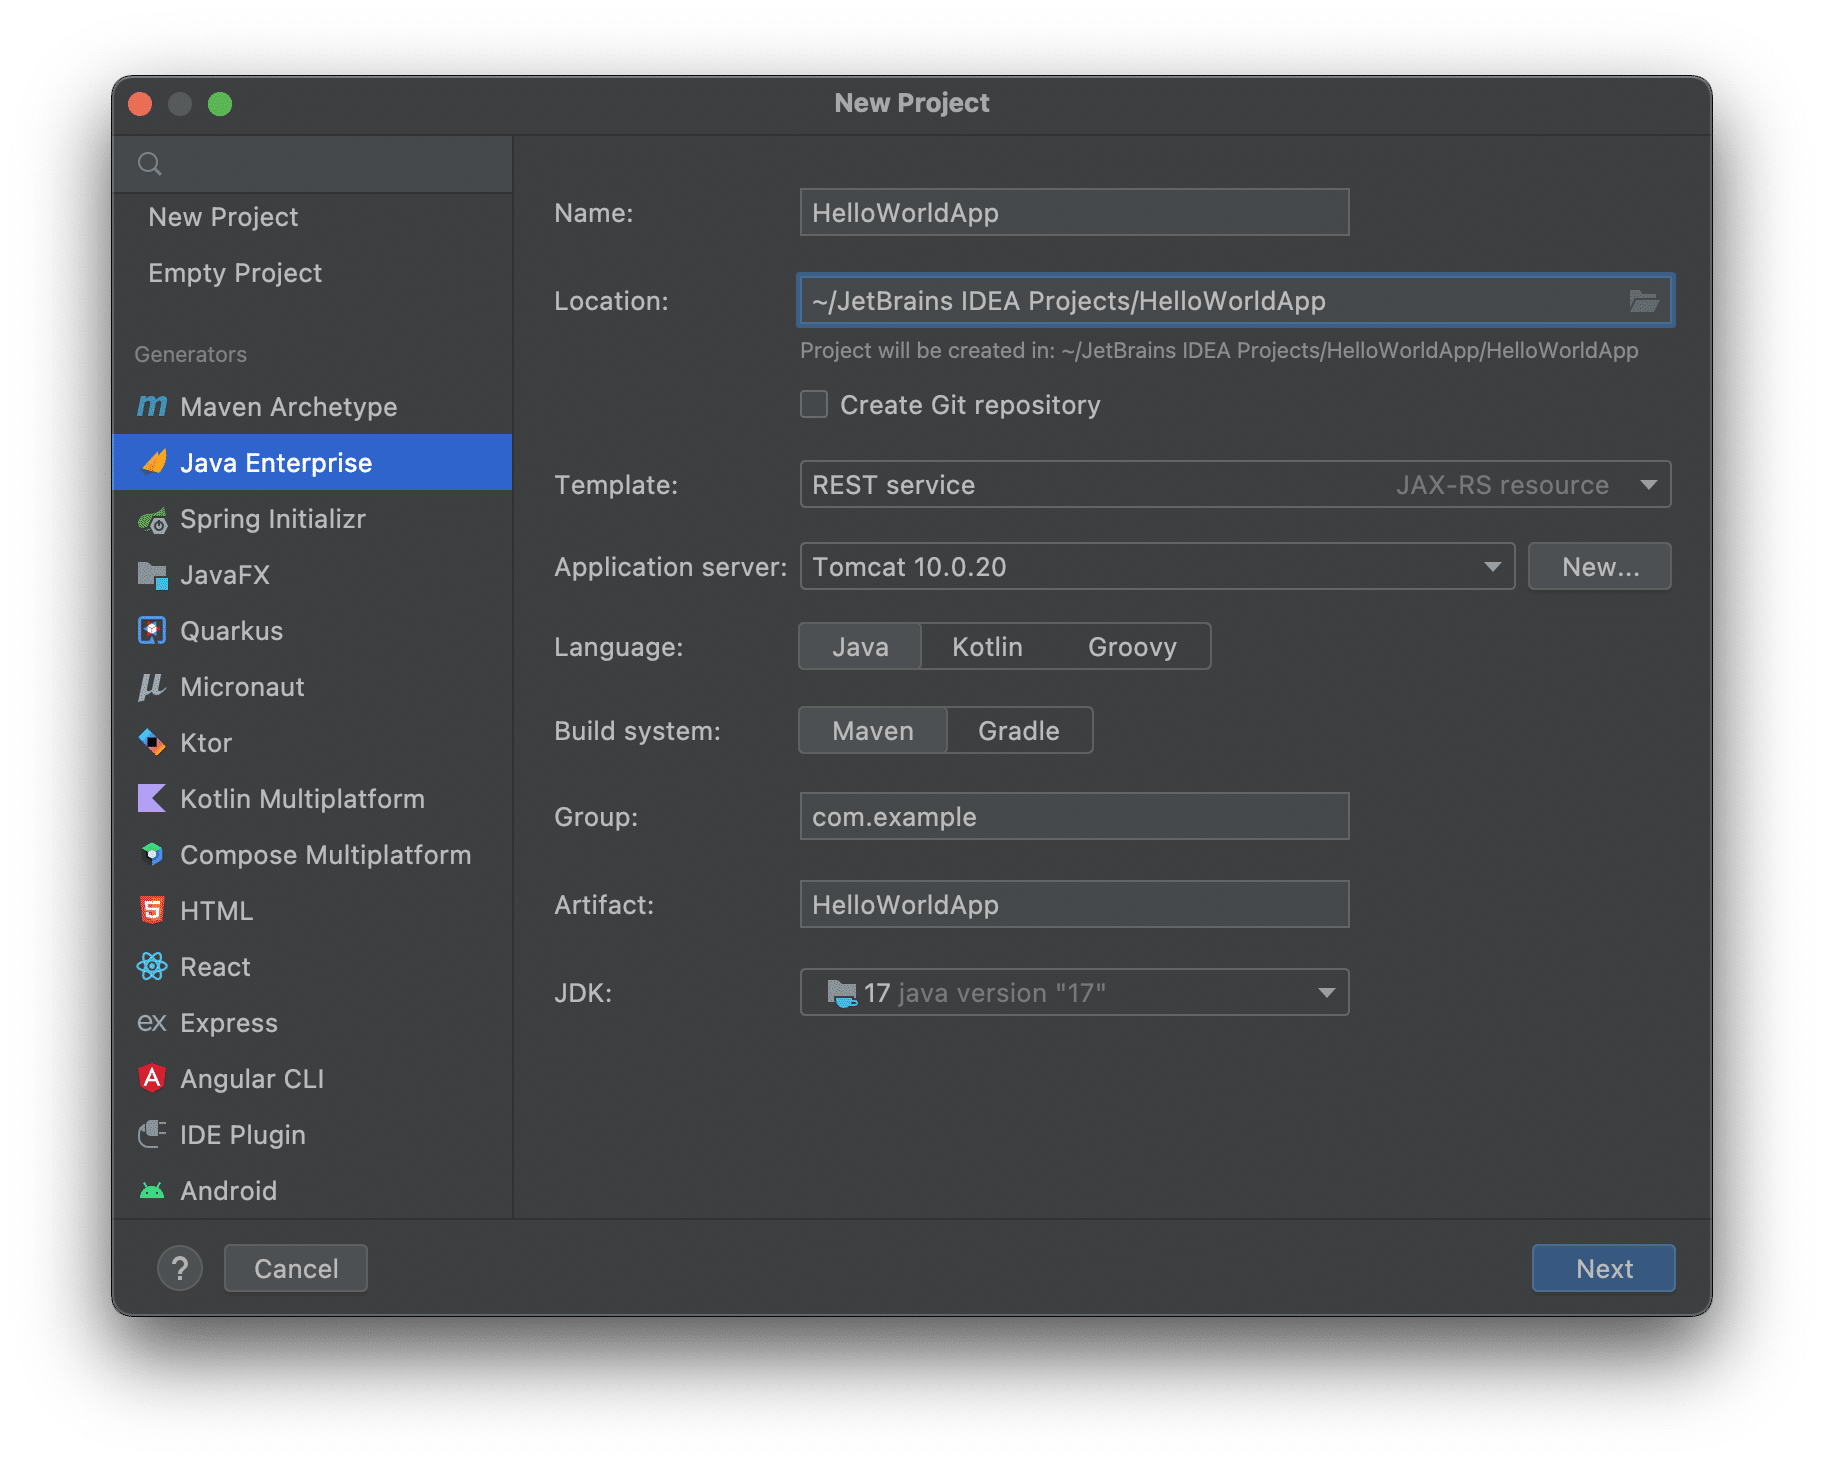
- From the Welcome Screen select New Project. If you have an existing project open, click File > New.
- Select Java Enterprise on the left-hand menu and enter the following details:
| Field Name | Description |
|---|---|
| Name | The name of your project, such as HelloWebApp. |
| Location | The location of your project. |
| Create Git repository | Select this checkbox if you want to use Git to version control the files in this project. |
| Template | We want to create a RESTful web application so leave the REST service template selected. |
| Application Server | Select New > Tomcat Server. For the Tomcat Home, browse to the directory where you have Tomcat installed. This will also populate the Tomcat base directory. Click OK. |
| Language | This blog post uses Java. |
| Build System | This blog post uses Maven. |
| Group | You can change this if required or leave it as the default com.example. |
| Artifact | This is the name of your project by default. You don’t need to change it. |
| JDK | I’m using JDK 17 for this blog post. |
- Click Next to go to the next step in the tutorial and select Jakarta EE 9 from the Version drop-down. The Eclipse Jersey Server and Weld SE have been preselected for us because we selected REST service as the template in the previous step.
- Click Create to set up the project. IntelliJ IDEA will now create our simple web application which will output “Hello, World!” when it receives a GET request.
You can open the Services window with ⌘8 (macOS), Alt+8 (Windows/Linux) to see the Tomcat server we just configured along with our web application.
We can run our application with ^R (macOS), or Shift+F10 (Windows/Linux) and this starts our Tomcat server. In the Run window ⌘4 (macOS), Alt+4 (Windows/Linux), you can check the logs to ensure that your Tomcat server is being deployed, however, IntelliJ IDEA automatically opens a browser when the URL of the application’s root context: http://localhost:8080/HelloWorldApp_war_exploded/.
You should receive a 404 error:
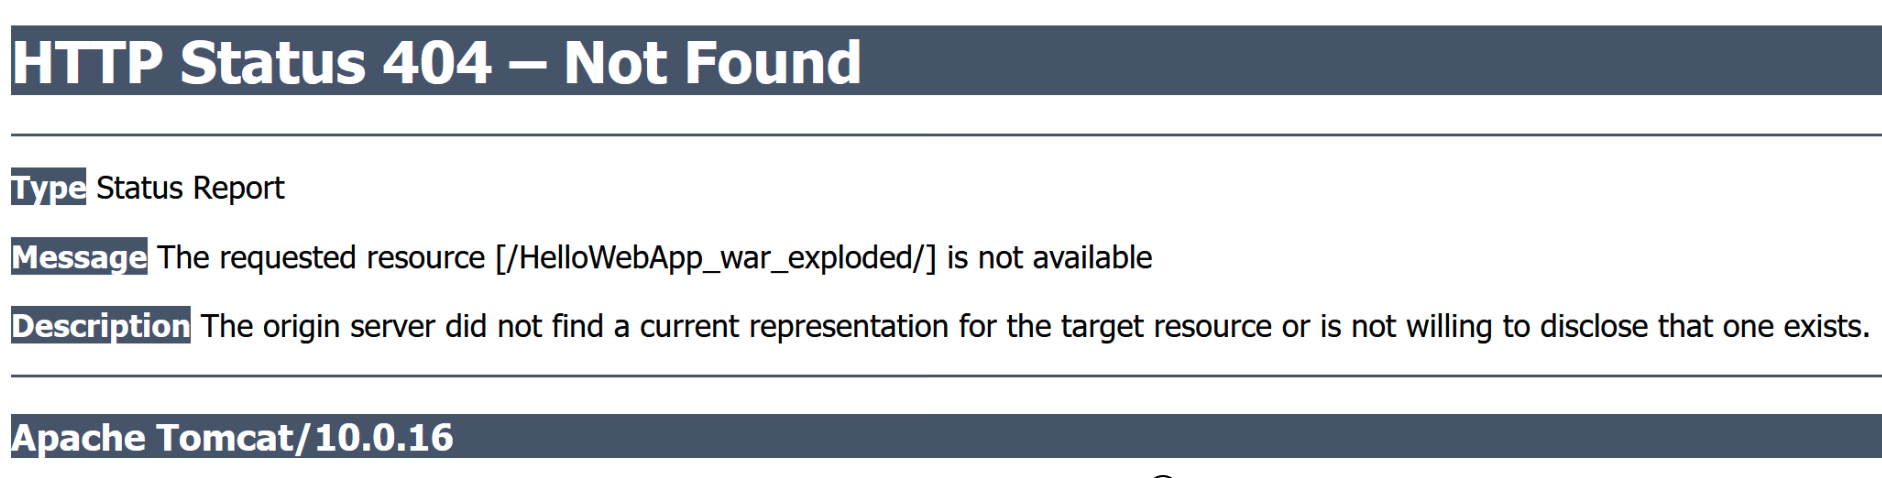
We get this 404 page because Tomcat is running and listening for requests, but our application has no view to display. For example, we don’t currently have an index.jsp file. (because it’s a simple service with some REST APIs). In the next step, we will figure out how to reach our application’s endpoint that displays the Hello World message.
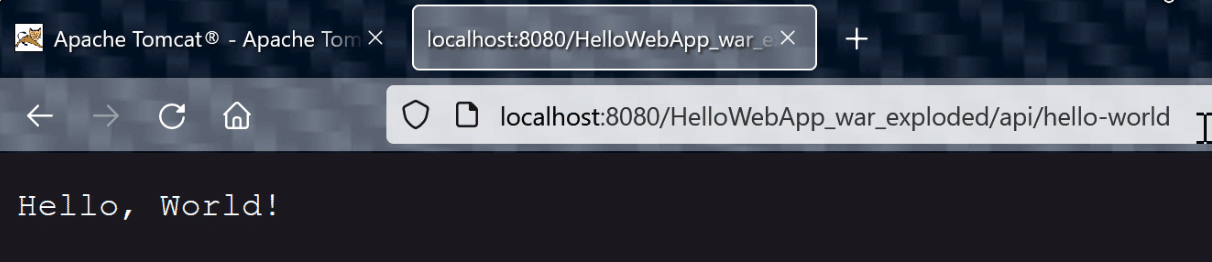
If we go back to our application code, we can find the ApplicationPath in our HelloApplication.java – which is /api. In addition, in our HelloResource.java file, our Path is set to /hello-world. This means we can make a GET request to the HelloResource by adding api/hello-world to the URL in my browser making the full URL: http://localhost:8080/HelloWorldApp_war_exploded/api/hello-world.
Now you will be able to see Hello World printed out in your browser:
Using an Existing Application with Tomcat
If you’re not creating a new project from scratch and instead have an existing project that runs on Tomcat, you can configure IntelliJ IDEA Ultimate to connect to your existing Tomcat installation. Let’s work with this application from GitHub:
- Clone the Project in IntelliJ IDEA and then go to Run > Edit Configurations.
- Select the + button and then Tomcat Server > Local (because we are running our Apache Tomcat server on our machine) from the drop-down:

- Give the configuration a name such as
tomcatand then click Configure next to the Application Server drop-down. - Paste in the same path we used earlier to point to the location of Apache Tomcat on your machine and press OK.
- Leave the remaining values as the default and click the Deployment tab at the top.
- Click the + to add a new deployment artifact and select
Artifact. - Select
MyWebApp:war explodedbecause that will allow you to update the application code without redeploying or restarting the server. - Click OK to finish configuring the Run configuration.
You can run the application with ^R (macOS), or Shift+F10 (Windows/Linux) and IntelliJ IDEA will open our browser at the application’s root context which in this case displays an actual page because this app has an index.jsp file.
Working with Tomcat in IntelliJ IDEA
Now that you know how to set up your IDE to work with Tomcat for both new and existing applications, let’s look at how to work with Tomcat during application development. We’ll refer to the first application we created called HelloWebApp for this section.
Let’s say we want to change our application and add a new POST method that takes in a name as a parameter and returns a custom greeting.
- Add the following method to your
HelloResource.javafile:
@POST
@Path("/{name}")
@Produces("text/plain")
public String customWelcome(@PathParam("name") String name) {
       return "Welcome " + name + "!";
}
- Stop your Tomcat server from running with ⌘F2 (macOS), or Ctrl+F2 (Windows/Linux) because we’re going to make some changes to our Run Configuration before we restart the server.
- In your Run Window, right-click on
Tomcat 10.x.x(or your version) then select Edit Configurations. You can also do this with ⇧F4 (macOS), or Shift+F4 (Windows/Linux). - Clear the After launch checkbox if you’d rather IntelliJ IDEA not open up a browser for you automatically. You might want to work with the HTTP client instead given it’s a RESTful application. You can also specify VM options to pass in if required.
- Save any configuration changes that you want to make and press OK.
- Now we’re ready to restart our Tomcat server with ^R (macOS), or Shift+F10 (Windows/Linux) to test the new POST method. We’re going to make a POST request right in the IDE using the HTTP Client. To bring up the HTTP client, use Search Everywhere ⇧ (macOS), or Shift+Shift (Windows/Linux) and type in
httpthen select HTTP Client. - Enter the following code to test your POST method (change the name at the end to yours):
POST http://localhost:8080/HelloWebApp_war_exploded/api/hello-world/Helen- Run your request with the green arrow in the gutter adjacent to your POST request. Your POST request should run successfully with a response that includes your custom greeting:
HTTP/1.1 200
Content-Type: text/plain
Content-Length: 14
Date: Fri, 29 Apr 2022 12:11:51 GMT
Keep-Alive: timeout=20
Connection: keep-alive

Welcome Helen!

Response code: 200; Time: 139ms; Content length: 14 bytes
Summary
We’ve talked about how to set up a new project with IntelliJ IDEA Ultimate and Tomcat and use Tomcat with an existing application.
We’ve also used the HTTP client available in IntelliJ IDEA Ultimate.
Here are some useful keyboard shortcuts for working with your Tomcat Server:
- You can run your application with ^R (macOS), or Shift+F10 (Windows/Linux)
- You can run your application with the debugger with ^D (macOS), or Shift+F9 (Windows/Linux)
- You can stop your application with ⌘F2 (macOS), or Ctrl+F2 (Windows/Linux)
- You can update your application with ⌘F10 (macOS), or Ctrl+F10 (Windows/Linux)
Alternatively, you can use the buttons to the left of the Services ⌘8 (macOS), Alt+8 (Windows/Linux) window to work with your Tomcat server.
If you’d like more information, please see the video on working with Tomcat in IntelliJ IDEA Ultimate from Dalia.
You can also check out the documentation on application servers support and running, debugging and configuring a Tomcat server.
The post Setting up and Working with Apache Tomcat in IntelliJ IDEA Ultimate appeared first on foojay.