 NLJUG – Nederlandse Java User Group NLJUG – de Nederlandse Java User Group – is opgericht in 2003. De NLJUG verenigt software ontwikkelaars, architecten, ICT managers, studenten, new media developers en haar businesspartners met algemene interesse in alle aspecten van Java Technology.
Automated tests play a significant role in the lifetime of a software product. New functionality is being added and, at the same time, old code is being refactored and improved every day. We need to make sure that what we have built is working and is actually working as expected. To ensure that, we use testing. Manual testing takes time and since it is done by humans, it is error-prone and easily something can be missed out. That is why we need an automated way to verify that what we are building is working as expected. The more often we run the tests, the sooner we identify flaws in our code and the faster we can act on fixing them (an article from Eftychia Thomaidou)
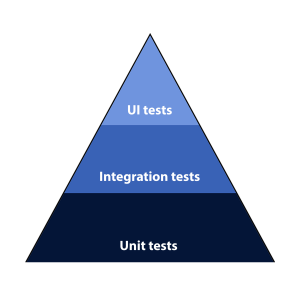
There are different types of automated tests. In our project, the unit and integration tests are developed by the developers in the team, and they live in the same repository as the code base. The acceptance tests, or else known, User Interface tests (UI), are developed by the testing team and they live in a separate repository. In the image below, one can see the pyramid with the different types of automated testing that often appear in a software project.
In this article, I will walk you through on how we have integrated the automated acceptance tests in the Continuous Deployment process of our project.
[We use Testing in order to minimise the gap between the requested functionality and the actual implementation.]
# The Set-up
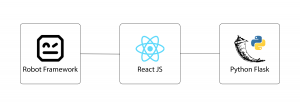
Our project is a Python/Flask application that uses React JS for the front-end. For the Acceptance Tests of our project we use Robot Framework. Robot Framework is an open source framework meant for browser testing with the use of selenium. This framework is application and operating system independent and its functionality can be enhanced with the use of Python. In our project, we use Robot Framework for writing end-to-end tests and in order to write the user scenarios as they are described in the Acceptance Criteria. The language of the framework is easily understandable by non-technical stakeholders and thus is easy for our Product Owner to confirm that the functionality that has been implemented actually meets the requirements.
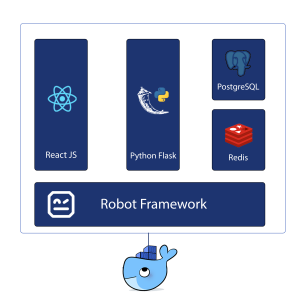
The client-side, the server-side and the Robot Framework code live in different repositories. When we push new Robot Framework tests, we trigger the pipeline that runs the tests against the latest versions of the client and the server-side of our product, in a ‘docker in docker’ setup.
In case this has sounded a bit too much to digest, let me elaborate!
We build a docker image from our Robot Framework code and we store it in the Gitlab registry.
Our Dockerfile, for the Robot Framework tests, looks like this:
FROM ppodgorsek/robot-framework:latest
COPY resources /opt/robotframework/resources
COPY tests /opt/robotframework/tests
COPY libs /opt/robotframework/libs
More specifically, we pull an existing docker image from Docker Hub, this is done with the FROM command. This image contains the Robot Framework, Chrome & Firefox browsers, along with some libraries needed for our tests. This image also executes the run of the tests. We just make sure that we copy our tests and all the files needed to run inside the docker image.
In a similar manner, a docker image is built out of the dev branch for the client and server-side of our application. Those images are stored in the Gitlab registry, as well. All our repositories are in the same group and thus they can share resources.
# Digging into the pipeline’s yml file
Now, we would like to run the tests against our application. Every service runs in its own docker container. In order to force them to be on the same network, and thus be able to find one another, we run them inside another docker container. This setup is called docker in docker, or else d-i-d, as it can be seen in the tags:- d-i-d. This whole configuration lives in the .gitlab-ci.yaml file and it looks like this:
run robot tests dev:
variables:
ROBOT_OPTIONS: “–variable ENV:dev -e FAIL -e PENDING”
services:
– name: docker:dind
stage: run-robot-tests-dev
image: docker:latest
script:
– mkdir -p reports
– docker login -u gitlab-ci-token -p $CI_JOB_TOKEN $CI_REGISTRY
– docker -H $DOCKER_HOST network create -d bridge localnet
– |
docker -H $DOCKER_HOST run -d –rm –network localnet \
–name postgres postgres:alpine
– |
docker -H $DOCKER_HOST run -d –rm –network localnet \
–name orchestrator $CI_REGISTRY/automation/orchestrator/dev:latest
– |
docker -H $DOCKER_HOST run -d –rm –network localnet \
–name orchestrator-client \ $CI_REGISTRY/automation/orchestrator-client/dev:latest
– docker -H $DOCKER_HOST run -d –rm –network localnet –name redis redis:alpine
– |
docker -H $DOCKER_HOST run –rm –network localnet \
–env “ROBOT_OPTIONS=${ROBOT_OPTIONS}” \
-v $PWD/reports:/opt/robotframework/reports \
–name robot $ROBOT_DEV_IMAGE
after_script:
– docker logs orchestrator >& reports/orchestrator.log
artifacts:
name: ${CI_JOB_NAME}-${CI_COMMIT_REF_NAME}
paths:
– reports/
when: always
tags:
– d-i-d
only:
refs:
– dev
Let us now dive into the code line by line. In order to have access to the Gitlab registry so to access the docker containers from other projects, one needs to be logged in. See in the code “docker login -u gitlab-ci-token -p $CI_JOB_TOKEN $CI_REGISTRY”. This can easily be achieved by the use of Gitlab’s global variables. Gitlab’s variables can be very handy to pass information among different pipelines or different steps on the same pipeline, but also to avoid hard-coding sensitive information to your Git repository. A link to those variables can be found under the citations section.
Next step, is the small network of different services that run inside a docker container. This can be seen in the following piece of code.
– docker -H $DOCKER_HOST network create -d bridge localnet
– |
docker -H $DOCKER_HOST run -d –rm –network localnet \
–name postgres postgres:alpine
– |
docker -H $DOCKER_HOST run -d –rm –network localnet \
–name orchestrator $CI_REGISTRY/automation/orchestrator/dev:latest
– |
docker -H $DOCKER_HOST run -d –rm –network localnet \
–name orchestrator-client \ $CI_REGISTRY/automation/orchestrator-client/dev:latest
– docker -H $DOCKER_HOST run -d –rm –network localnet –name redis redis:alpine
– |
docker -H $DOCKER_HOST run –rm –network localnet \
–env “ROBOT_OPTIONS=${ROBOT_OPTIONS}” \
-v $PWD/reports:/opt/robotframework/reports \
–name robot $ROBOT_DEV_IMAGE
In detail, the $DOCKER_HOST variable is a docker variable and it points to the daemon socket of the outer docker container. This variable is used so that the inner docker containers know where to connect to.
Since we want to have a small network of docker containers that run on a single host, we use a bridge network. This is achieved by the script command “docker -H $DOCKER_HOST network create -d bridge localnet”. We then pass the flag “–network localnet” to the rest of the docker containers to make sure that they are on the same network.
As a following step, the different services are run as docker containers on our bridge network.
We run the images detached (-d) and once their job is completed, the docker containers are removed (–rm).
In other words, what we have now achieved is to pull the latest dev images for the client-side and the server-side and run them together with the postgres and redis, inside a bigger docker container. Running postgres and redis, along with the rest of our services, is a choice specific to our project. One could replace them with a MySQL database for example, or something else analogous to the requirements of another project.
This whole step in our pipeline, is called run robot tests dev and it will be executed only from our dev branch (see the only:refs keyword).
# Communicating with Robot framework
variables:
ROBOT_OPTIONS: “–variable ENV:dev -e FAIL -e PENDING”
script:
– mkdir -p reports
– |
docker -H $DOCKER_HOST run –rm –network localnet \
–env “ROBOT_OPTIONS=${ROBOT_OPTIONS}” \
-v $PWD/reports:/opt/robotframework/reports \
–name robot $ROBOT_DEV_IMAGE
after_script:
– docker logs orchestrator >& reports/orchestrator.log
artifacts:
name: ${CI_JOB_NAME}-${CI_COMMIT_REF_NAME}
paths:
– reports/
only:
refs:
– dev
Additionally, we pass some parameters to Robot Framework as well, through the ROBOT_OPTIONS. For example, we specify which environment is to be used (for example dev, locally or staging), so that Robot Framework knows against which URL to run the tests. But how does Robot Framework know how to use the information that we provide? Inside a Python file resources/variables.py, we define a function get_variables that receives as argument the string that points to the environment (eg ‘local’, ‘dev’ or ‘staging’) and that returns a Python dictionary (equivalent to a Java Map) with all the predefined variables for this environment. The name of the function is specific as this is a special function for Robot Framework. According to the Robot Framework’s User Guide, under the ‘Getting variables from a special function’ section, if such a function exists, Robot Framework calls it and expects to receive variables as return value in the form of a Python dictionary or a Java Map with variable names as keys and variable values as values. We thus, make use of this special function and we include it in our .robot file like this:
*** Settings ***
Variables variables.py ${ENV}
Note that this ENV variable is exactly the same as the one we provided in the ROBOT_OPTIONS definition inside our pipeline.
# Exporting Robot Framework’s reports as artefacts
Digging further into the Github code for the Robot Framework container that we use (see the link under the citations section), we can see that the developer, that implemented this Docker image, specifies an alternative output directory for Robot Framework. Normally, Robot Framework exports all the output files in the current working directory. However, this image exports all the files in the reports folder; this is achieved by using ‘–outputDir /opt/robotframework/reports’ inside the bin/run-tests-in-virtual-screen.sh script. That is very convenient for us, because we can easily create a volume and export the output files as artefacts in our pipeline. We do that by providing the paths: keyword. Note that first, we had to create the reports folder in our outer container inside the script ‘script: – mkdir -p reports’. In a similar manner, we expose the server-side logs into the reports folder, as well. Have a look at the after_script: ‘- docker logs orchestrator >& reports/orchestrator.log’. This can be proven useful when debugging an issue. Here again, we make use of Gitlab’s global variables. This time we use them in the name of the zip file that gets generated. This is handy so to generate an artefact with a unique name, each time we run the pipeline. Take a look at the “name: ${CI_JOB_NAME}-${CI_COMMIT_REF_NAME}”.
# Running the Robot Framework tests as part of the DoD
When the developers of our team merge their Pull requests, they first run the Robot Framework Tests against their new implementation and if the pipeline succeeds, then they can proceed and deploy to the server. Since the repositories live under the same group, the different yml files can make use of steps specified in another yml file. This way, the pipelines of the client-side and server-side can call the pipeline from the Robot Framework tests and trigger a run.
This can be done like this:
run robot tests on dev:
stage: development
trigger:
project: path/to/the/robot-tests/repo
branch: dev
only:
refs:
– dev
This piece of code lives inside the .gitlab-ci.yml file of the client and server-side repositories of our project. So when the pipeline runs on the dev branch of the application, it triggers the run of the Robot Framework tests. By specifying which branch to pick from our Robot Framework tests repository (trigger:branch:), we also specify which pipeline steps will be executed.
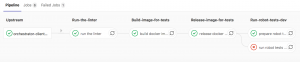
In the image below, one can see the pipeline from the client-side (upstream) calling the pipeline of our Robot Framework Tests (downstream). The shown diagram looks like a river that flows downwards.
To sum up, this is how one runs a multi-project pipeline in Gitlab CI/CD. Luckily all this functionality is available in the free version of Gitlab CI/CD, so you can try it out for your own project as well! This was an example from the setup that was implemented in our team that can easily be used in any other team or project. One simply needs to replace the docker images with those required.
It is really important that automated testing becomes part of the Definition of Done in a project and that it is introduced as soon as possible in the pipeline. Early discovery of flaws can minimise significantly the cost of solving issues in production. Good luck with your own pipeline!
Citations:
https://docs.gitlab.com/ee/ci/multi_project_pipelines.html
https://docs.gitlab.com/ee/ci/variables/
https://hub.docker.com/r/ppodgorsek/robot-framework
https://github.com/ppodgorsek/docker-robot-framework
https://github.com/microsoft/docker/blob/master/docs/userguide/networking/dockernetworks.md
Bio:
Eftychia is an all-round developer & team player. Finished her Masters in Bioinformatics, has worked as a developer and tester. She enjoys seeing things from different points of view. In her free time, Eftychia follows meetups, writes snail mail and plays Dungeons & Dragons.