 NLJUG – Nederlandse Java User Group NLJUG – de Nederlandse Java User Group – is opgericht in 2003. De NLJUG verenigt software ontwikkelaars, architecten, ICT managers, studenten, new media developers en haar businesspartners met algemene interesse in alle aspecten van Java Technology.
We continue building our microservices system by adding a coordination layer to handle spinning multiple services up and down.
In previous articles, we grew from two Spring Boot applications to three applications + a database container.
As we continue to scale and broaden our system, we will need something to coordinate service and ensure consistent communication (avoid human error).
We will do this through docker-compose, an orchestration tool that manages containerized applications.
For our project, this means we have two high-level steps to get managed microservice containers:
- Containerize our currently-local applications
- Set up the management layer with Docker Compose.
Neither of these may seem daunting, but I ran into a few unexpected gotchas, which I will be sure to mention. 
Let’s get started!
Architecture
We began this project with minimum functionality explained in the level 1 blog post. Currently, our microservices system consists of three services and a database container. While still pretty small in the microservices world, issues like coordination are already surfacing, so this is a good time to introduce orchestration tools like Docker Compose that attempt to reduce that pain.
The services or functionality have not changed from the previous blog post, but the management of them has.
Here is the updated architecture:
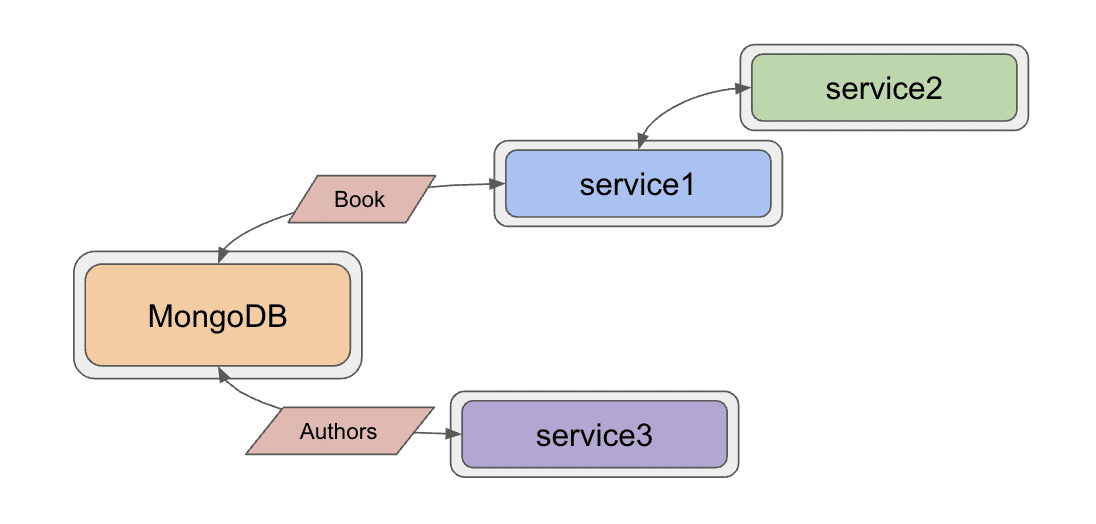
The border around each service represents the container housing each application. All of the services are encompassed in a larger grey area that shows how Docker Compose groups these services together. Containerizing our applications means a couple of code changes to minimize environment or configuration changes later. The first of these is to create additional methods in each service for testing.
Added test methods
I ran into some errors when testing endpoints, but it was hard to tell the root cause (database, authentication, Docker compose, or something else entirely). To help debugging, I added a method to each service called liveCheck() that elimiates a database call, returning a string to confirm our service is up.
I also added a method to service1 and service3 that returns a single entity (book or author), so if network is slow or the database has trouble returning all the objects, I can test a single result.
All code for these methods is on Github, linked for each service below.
- Service1: liveCheck() and getBook() methods
- Service2: liveCheck() method
- Service3: liveCheck() and getAuthor() methods
Containerizing – Service 1
To create a container for service1, we need a Dockerfile in the application folder (/service1).
#Pull base image
#-----------------
FROM openjdk:11

#Author
#-------
LABEL org.opencontainers.image.authors="Jennifer Reif,jennifer@thehecklers.org,@JMHReif"

#Copy jar and expose entrypoints
#--------------------------------
COPY target/service1-*.jar goodreads-svc1.jar
ENTRYPOINT ["java","-jar","/goodreads-svc1.jar"]
First, I want a Java environment in the container, so Docker will pull openjdk’s version 11 image as the base layer. Next, is the author/maintainer information so users know who to contact. Lastly, there are a couple of instructions to copy the JAR file (packaged application) into the container (COPY) and then add commands/arguments for the build command (ENTRYPOINT).
In the next section, we will see how to prepare for a containerized application.
Service 1 – packaging the application
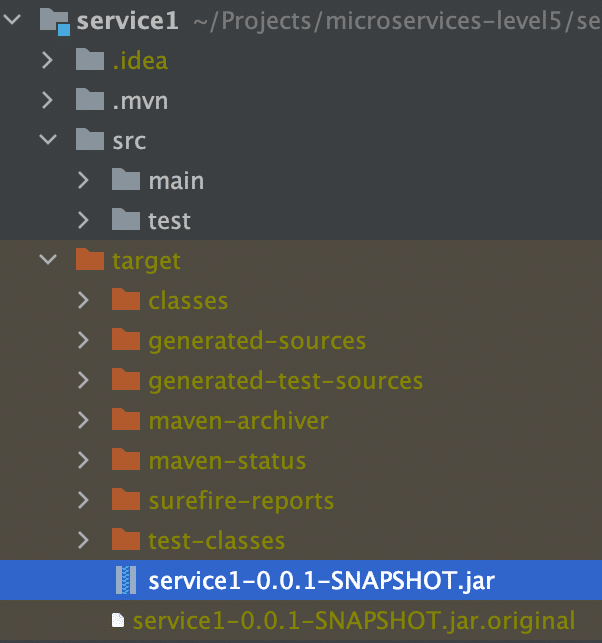
The first step is to package the app into a .jar file by running mvn clean package from the service1 folder.
*Note:* Assumes Maven is installed. You can verify by running mvn --version at the command line. If it is not found, you can download it from the Maven website.
Once you package the application, you can verify by navigating to the service1 target folder and checking whether there is a service1-0.0.1-SNAPSHOT.jar as in the screenshot below.
Next, we could go ahead and build this individual container, but we want to manage all of the containers together. Instead, we will use wait and use Docker compose, so let’s do the same steps for service2.
Containerizing – Service 2
Creating a container for service2 looks nearly identical to what we did above, with only differing names for the application’s filename.
For brevity, Service2’s Dockerfile is on Github.
Service 2 – packaging the application
We also need to package the service2 application. From the service2 folder, we run the mvn clean package command to bundle up the application. We can verify it worked by checking the target folder to find a service2-0.0.1-SNAPSHOT.jar file.
Let’s do the same for service3, for the third and final time!
Containerizing – Service 3
Steps for service3 mirror what we have done for the previous two services, so we will condense with a link to service3’s Dockerfile on Github.
Service 3 – packaging the application
We will run mvn clean package in the service3 folder, which we can verify in the target folder with a file named service3-0.0.1-SNAPSHOT.jar.
Now we are ready to set up Docker Compose to manage all of our prepped services.
Docker compose for everything
We need to create a YAML file with container details, configuration, and commands we want Compose to execute.
At the high level, we will list each of our services, then specify subfields for each. We will also set up a dedicated network for all of the containers to run on. Let’s build the docker-compose.yml piece by piece in the main project folder.
version: "3.9"
services:
  goodreads-db:
    container_name: goodreads-db
    image: jmreif/mongodb
    environment:
      - MONGO_INITDB_ROOT_USERNAME=mongoadmin
      - MONGO_INITDB_ROOT_PASSWORD=Testing123
    ports:
      - "27017:27017"
    networks:
      - goodreads
    volumes:
      - $HOME/Projects/docker/mongoBooks/data:/data/db
      - $HOME/Projects/docker/mongoBooks/logs:/logs
      - $HOME/Projects/docker/mongoBooks/tmp:/tmp
The first field displays the Docker compose version, though it is not required. Next, we will list our services. Instead of running our database container separately as we have been, we include it here so that Docker Compose handles everything. The child fields for each service contain a few details and configurations. We will go through those in the next subsections.
Goodreads-db
Under goodreads-db, we have the container name, so we can reference and identify the container by name. The image field specifies whether we want to use an existing image (as we have done here) or create a new image.
*Note:* I am running on Apple silicon architecture. If you are not, you will need to build your own version of the image with the instructions provided on Github. This will build the container locally with your architecture.
The next field sets environment variables for the database container for connecting to the database with the provided credentials (username and password). Specifying ports comes next, where we map the host post to the container port, allowing traffic to flow between our local machine and the container via the same port number. *Note:* It is recommended to enclose the port field values with quotes, as shown.
Next, we have a networks field, which specifies a custom network that we want this container to join. This was the part that took some time to figure out. Docker compose documentation has a page dedicated to networking, but I found the critical information easy to miss.
To summarize, if we do not specify a custom network in the Docker compose file, it will create a default network. Each container will only be able to communicate with other containers on that network via IP address. This means if containerA wants to talk to containerB, a call would look like curl
One way around this is to create a custom network, which allows containers to reference one another by container name, instead of just IP address. This an improvement, both to solve dynamic IP issues, as well as human memory/reference issues. Therefore, this is what we have done by using the networks field for each service, then defining the network itself at the bottom of the docker-compose.yml.
The final subfield in the goodreads-db service is to mount volumes from the local machine to the container, allowing my database to store the data files with our book and author data in a permanent place so that the loaded data does not disappear when the container shuts down. Instead, each time the container spins up, the data is already there, and each time it spins down, any changes are stored for the next startup.
Now that we got through our first service definition, the following ones should be faster. Let’s look at the goodreads-svc1 next.
Goodreads-svc1
......
  goodreads-svc1:
    container_name: goodreads-svc1
    image: jmreif/goodreads-svc1
    ports:
      - "8081:8081"
    depends_on:
      - goodreads-db
    networks:
      - goodreads
    environment:
      - SPRING_DATA_MONGODB_URI=mongodb://mongoadmin:Testing123@goodreads-db:27017
      - SPRING_DATA_MONGODB_DATABASE=goodreads
We use the familiar container_name, image, and ports fields. After that, we specify one new field called depends_on that lists any services service1 depends on for startup and shut down. In other words, if the database service is not up, then service1 cannot start because all of its functionality relies on making calls to the database.
Next, we have the networks field that says we want service1 to also be on the custom network of goodreads (along with our database service). The last field for environment externalizes our connection details for the application to connect to the database.
If you look at service1’s application.properties file, you will see that the fields and values nearly match. The first change is that the format. Spring properties have name.name (lowercase, dot separation), and environment properties use NAME_NAME (uppercase, underscore separation). We also changed the URI to reference the container name of goodreads-db instead of the localhost in the application. Spring will first create a priority for the environment variables, and if those do not exist, fall back on local variables. This means that our configuration in the docker-compose.yml will be used first. However, if we test locally, those environment variables will not exist, and it will use localhost. So, our application will work in different environments dynamically!
Next is service2.
Goodreads-svc2
......
  goodreads-svc2:
    container_name: goodreads-svc2
    image: jmreif/goodreads-svc2
    ports:
      - "8080:8080"
    depends_on:
      - goodreads-svc1
    networks:
      - goodreads
    environment:
      - BACKEND_HOSTNAME=goodreads-svc1
Service2 configuration looks very similar to service1, except for the environment variable. What is the BACKEND_HOSTNAME=goodreads-svc1? If you take a quick look at the code for service2 in level4, you might recall that we hard-coded a localhost value for the WebClient bean. This will not work in a Docker network because it is separate from the host machine’s network. We need to reference containers by name, instead. However, we also want to be dynamic and test in local environments (localhost), as well as production environments (Docker Compose).
To do this, we will create a dynamic variable with Spring’s @Value annotation and set that in our Docker compose file using an environment variable. This is similar to what we did with the environment variables in service1. If Docker compose finds the environment variable, it will use that value; otherwise, it will use localhost.
Our updated code in our service2 application is below.
@SpringBootApplication
public class Service2Application {
	@Value("${backend.hostname:localhost}")
	private String hostname;

	......

	@Bean
	WebClient client() {
		return WebClient.create("http://" + hostname + ":8081");
	}
}
In the code above, we create a String variable with @Value that looks for backend.hostname value first. If it doesn’t find it, the value falls back to localhost value. Then, in the @Bean definition, we insert the variable hostname in the middle of the URL.
Next, we need to set the environment variable for BACKEND_HOSTNAME in the Docker compose file to equal the container name (in this case, goodreads-svc1). This creates our dynamic hostname, so that running in a local or Docker environment will allow it to work without any changes.
Changes to the application need to be repackaged, so we can go back to the service2 folder from the command line and re-run mvn clean package to update the JAR file.
Let’s move on to service3.
Goodreads-svc3
......
  goodreads-svc3:
    container_name: goodreads-svc3
    image: jmreif/goodreads-svc3
    ports:
      - "8082:8082"
    depends_on:
      - goodreads-db
    networks:
      - goodreads
    environment:
      - SPRING_DATA_MONGODB_URI=mongodb://mongoadmin:Testing123@goodreads-db:27017
      - SPRING_DATA_MONGODB_DATABASE=goodreads
We have all of the same fields (and some of the same values) for service3 as we did for service1 because both services are rest apis for the database container. Both services need to depend on the database container running, and both define environment variables for connecting to it.
The last piece is to define our custom network.
docker-compose.yml network
networks:
  goodreads:
We need to define a high-level field that defines our custom Docker network that all of the services will join in order to communicate with one another using container names. The networks field states any custom network names along with any potential configurations. Since we don’t need anything fancy, the network goodreads is the only thing required.
You can view the full docker-compose.yml file on Github.
Put it to the test
Docker compose will handle starting all of the containers in the proper order, so all we need to do is assemble the command.
docker-compose up -d
*Note:* If you are building local images with the build field in docker-compose.yml, then use the command docker-compose up -d --build. This will build the Docker containers each time on startup from the directories.
The containers should spin up, and we can verify them with docker ps. Output for starting the services and verifying they are running is shown below.


Next, we can test our endpoints.
- Service1: open a browser and check the service is live with
localhost:8081/dbor go to command line withcurl localhost:8081/db. Then, test the dataset withlocalhost:8081/db/booksandlocalhost:8081/db/book/623a1d969ff4341c13cbcc6b. - Service2: open a browser and check the service is live with
localhost:8080/goodreadsor go to command line withcurl localhost:8080/goodreads. Then, test the dataset withlocalhost:8080/goodreads/books. - Service3: open a browser and check the service is live with
localhost:8082/dbor go to command line withcurl localhost:8082/db. Then, test the dataset withlocalhost:8082/db/authorsandlocalhost:8082/db/623a48c1b6575ea3e899b164.
When everything looks good, we can run docker-compose down, which will stop each of the services in necessary order and remove those along with the custom network. Clearing everything out will help give us a clean run each time we start the services.
Wrapping up!
This post covered quite a bit of material, although we did not alter or add any more services. We added a couple extra methods to each service to help us test/debug issues with the applications, then we packaged the applications into JAR files. Next, we created Dockerfiles for each service that would allow Docker to create a container that copies and executes the service JAR.
We then tackled Docker Compose, which manages the services together using information we specify in the docker-compose.yml file. We also covered the tricky “gotchas” with Docker networks and handled dynamic runtimes with environment variables and the @Value annotation.
Finally, we saw how to run everything with a single docker-compose command and how to test each of our endpoints to our applications still operate as expected. When we are done, we can run another docker-compose command that stops the system and cleans out the setup, so we have a clean environment when we want to run again.
There is so much more we can explore with microservices, such as adding more data sources, additional services, asynchronous communication through messaging platforms, cloud deployments, and much more. I hope to catch you in future improvements on this project. Happy coding!
Resources
- Github: microservices-level5 repository
- Github: Meta repository for all related content
- Documentation: Docker compose
- Blog post: Baeldung’s Introduction to Docker Compose
The post Journeys in Java, Level 5: Building an Empire of Microservices appeared first on foojay.